This is a tutorial on how to use Apache httpd as a media streaming center. I wanted to be able to stream my media across my local network, without having to mess with a lot of things, so I will explain how I set it up using apache and the built in modules. So, lets get started.
My environment is as follows:
- Fedora 23 Workstation running as the server
- My media drive is mounted at
/mymediaon my computer. Yours might be somewhere else in your file tree or you might not have a separate media drive, and it is stored in your home directory.
- My media drive is mounted at
- Apache/2.4.18
- A Wireless Router
Server Set Up
The first thing you need to do is install Apache. You can do this through
the package manager. You can use either of the following commands, however
you should use dnf if you are running at least Fedora 21.
yum install httpd
dnf install httpd
After installing Apache you need to start it and enable it on boot. For this step you need to be root.
# For SystemD based systems
sudo systemctl enable httpd
sudo systemctl start httpd
# For old SysVinit systems
chkconfig httpd on
/etc/init.d/httpd start
Once, you’ve enabled apache on boot, and started it we can start
configuring apache. So first off, we are going to disable to welcome page
conf. So, we need to comment out the entirety of the file
/etc/httpd/conf.d/welcome.conf, because otherwise this file will be
restored on upgrades and we don’t want that. Once you disable that we will
be writing SELinux policy, so that we can access the files that are not
necessarily in the main apache serve directory. You only need to do this
if you are running a Linux box with SELinux enabled.
# Set the following directory regex as readable by httpd
semanage fcontext -a -t http_sys_content_t "$MEDIA_MOUNT_POINT(/.*)?"
# Tell SELinux to use the updated rules
restorecon -rv $MEDIA_MOUNT_POINT
The above commands assume that MEDIA_MOUNT_POINT is where you have
mounted your media drive in your directory tree, or where ever it is
stored. If you have your media spread out over several directories, then
you need to run the above commands for each directory included.
Additionally you will need to check the file permissions to access the directory containing your media. The parent directories to your media must be world readable and executable, and the files must be world readable. So, for each of the parent directories run the following commands.
# Use this command on each of the parent directories all the way down.
# Do not apply this to your home directory or directories that you don't
# want the contents visible to all, set those directories permissions to
# 711
chmod 755 directory
# The files inside of the media folder need to be world readable so from
# the media root run this to recursively set them world readable.
cd $MEDIA_LOCATION
find . -type f -exec chmod 644 {} +
find . -type d -exec chmod 755 {} +
Then we need to enable directory listings in the root Apache directory, so
create a .htaccess at /var/www/html with the content below.
Options IndexesFinally we will create a symlink to each of the media directories you want
exposed to the user. To do that we use ln, which is demonstrated below.
You should be in the root Apache directory, which is typically
/var/www/html, so run this commands in the Apache root.
# LOCATION_LINKED_TO must be an absolute path
ln -s "$SYMLINK_TITLE" "$LOCATION_LINKED_TO"
Client Set Up
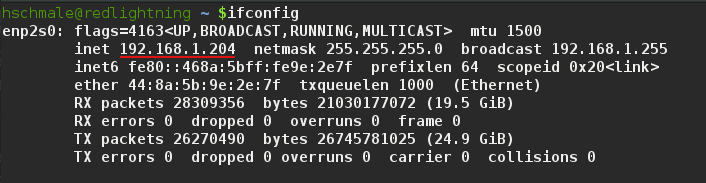
To access your server from the client, like a tablet, you must get the ip
address of your server on the local network, so use ifconfig to retrieve
it. You are a looking for the inet field of your local network connection.
The ip address is underlined in red in the below picture
Then you enter the server ip address into any other device connected to local network, and you can stream movies to it over http.
Additional Things You Can Do
If you want to get fancy with the file browsing, you could install php and h5ai, which is a fancy file browser.
You could also configure a dns server on your local network, to give your media center a pretty name instead of just an ip address, but that is a tutorial for another time.